Running DockLedger
Everything from a lorry booking a slot to a pack leaving the bench, in the order you would actually do it. Written for the site office, the goods-in team and the cutting room — not for IT.
Last updated 8 September 2026
What DockLedger does
DockLedger is the record of what happens at your dock. Carriers book a slot, drivers check themselves in on their phone, your team says which gate to go to, and every minute of it lands on a shared board that the whole site can see. When the delivery is unloaded, the same record follows the stock: what was declared, what actually came off, which slot it went into, and which pallet should be picked next.
It replaces the things most sites are doing instead — a shared spreadsheet, a clipboard on the gate, a WhatsApp group, and someone's memory. The reason to bother is that when a carrier disputes a demurrage charge six weeks later, you have the timestamps, and when a customer asks why they got stock that was two days off code, you can show which pallet was picked and why.
It is two kinds of screen. The console is what the office uses at a desk: the board, the yard, stock, the pick board, billing. The floor apps are what people carry: the checker app for goods in, the picker app, the counter, the butchery app and the bench station. Nothing on the floor is typed twice — a scan on the floor is the entry in the office.
You only see what you switch on
Getting started
The first ten minutes
- Create your workspace. Go to dockledger.co.uk and start the free trial. A workspace is your site — its bookings, its contacts, its racking. Nobody outside it can see any of it.
- Confirm your email. You will get a link. Until you click it you can sign in but not much else.
- Look at a working day before you type anything. Open the account menu at the top right and choose Load demo data. It fills the board with realistic deliveries, contacts and stock so you can see how the screens behave. Clear it again from the same menu when you are done — it never mixes with your real records.
- Follow the Getting started card. The Overview shows a short checklist — loading bays, waiting-time terms, the arrival sign, contacts, your first booking, your team, your racking — and ticks each item off as the workspace fills in. Hide it when you are done; it comes back from the account menu.
Finding your way around
Everything is in the rail down the left-hand side, in the order a day happens:
- The yard — Overview, Live Bookings, Yard & Gates, Deliveries & Paperwork, Contacts, Telematics.
- The warehouse — Stock, Racking & Slots, Goods In, Pick Board, Transport, Stock Takes, Traceability.
- The business — Waiting Times, Users & Team, Plan & Billing, Site & arrival, Wallboard, Mobile apps.
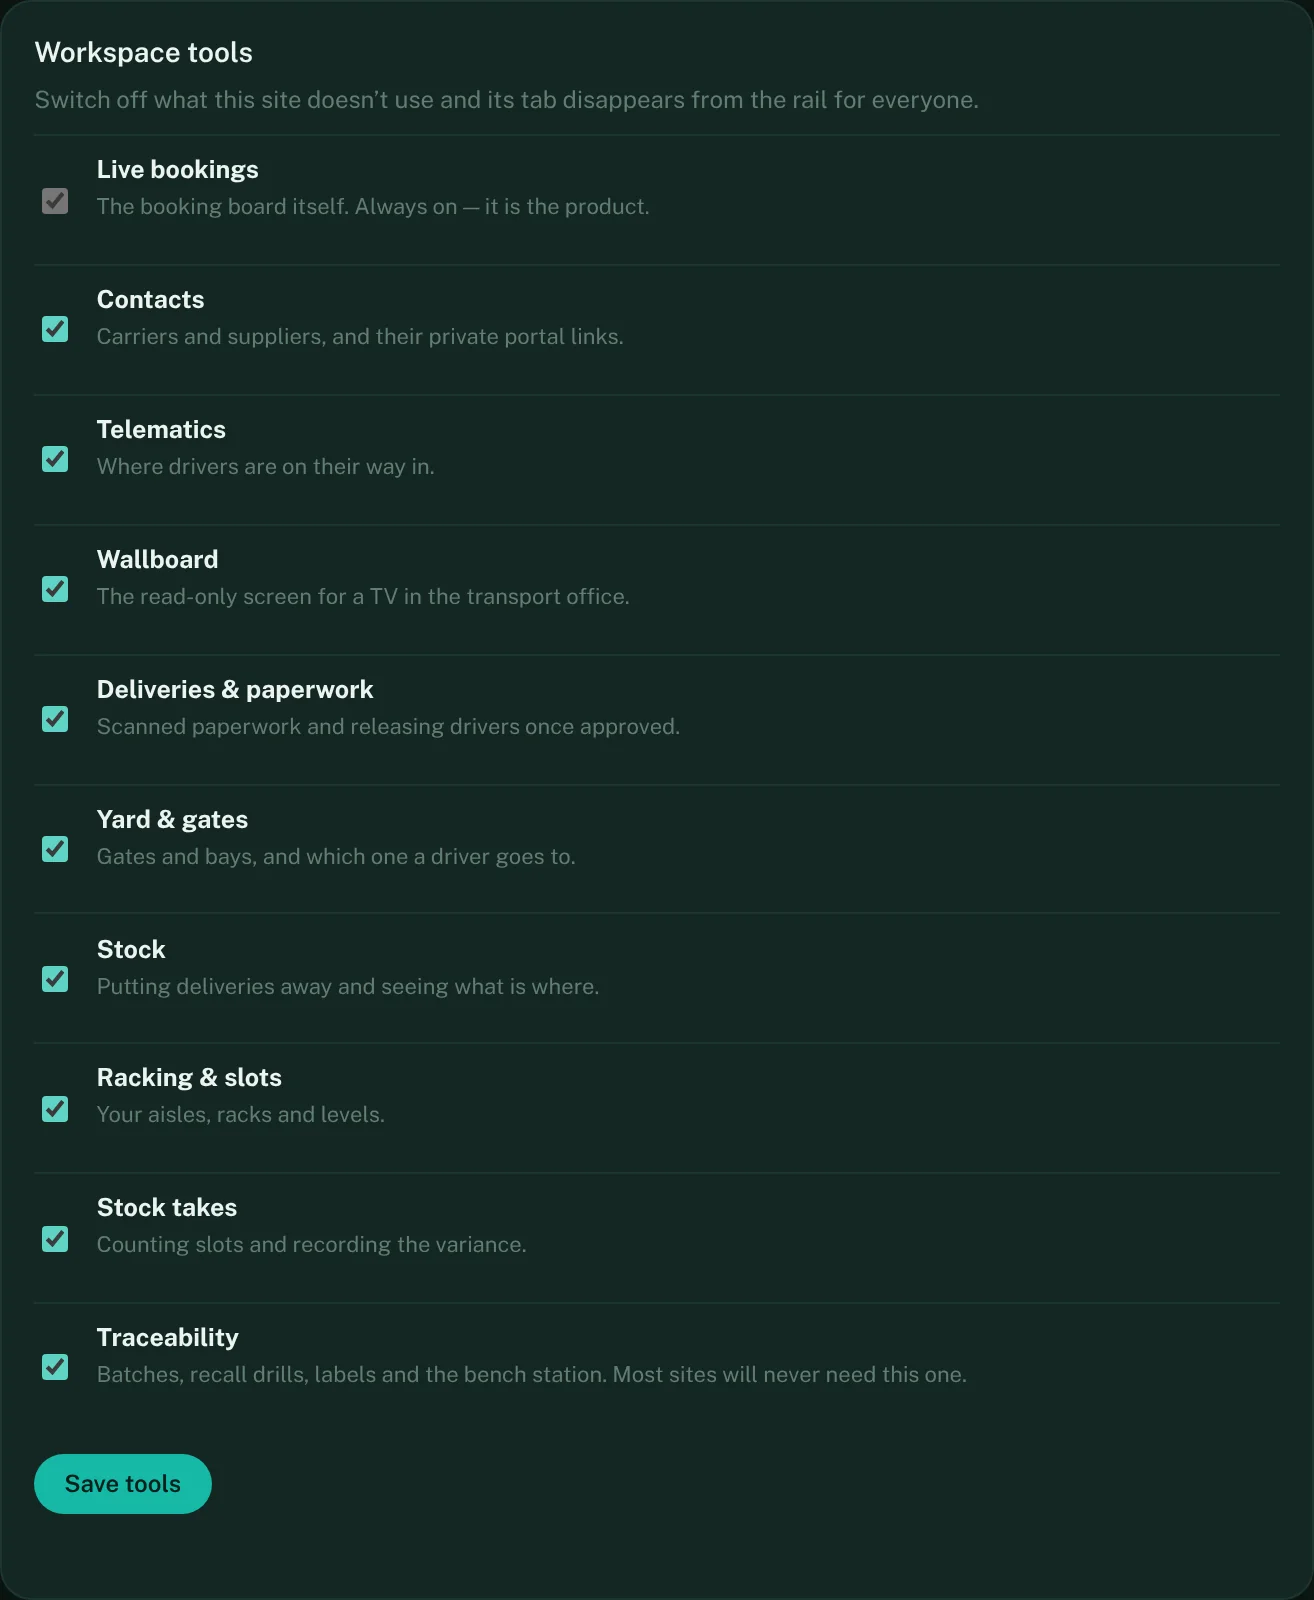
A tab only appears once its module is switched on under Plan & billing, and a site can hide any tab it does not use from Workspace tools on the same screen. Switching something off hides the tab for everyone but keeps every record in it, so nothing you entered is ever lost to a change of plan.
Setting up your site
- Switch off what you don't do. Plan & billing → Workspace tools. Turn on only what this site actually does.
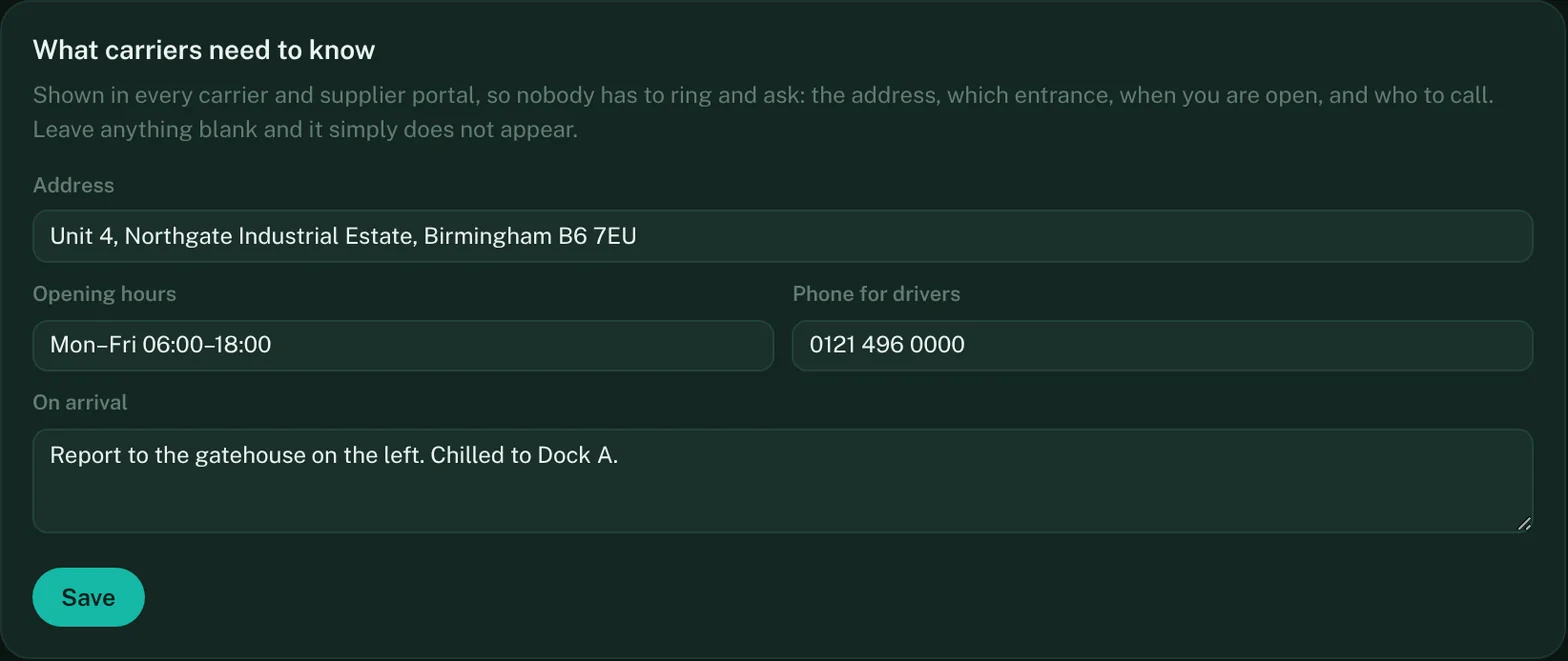
- Tell carriers how to find you. Site & arrival → What carriers need to know. Address, opening hours, a phone number for drivers, and what to do on arrival. Written once, it reaches every carrier you have ever issued a portal link to.
- Print the gate sign. Site & arrival → Open the printable gate sign. It carries the QR code drivers scan to check themselves in.
- Add your carriers and suppliers. Contacts. Add them one at a time, or drop in a CSV or Excel export with Import from a spreadsheet — Name is the only column it insists on. Set each one's free time and detention rate here and the waiting-time evidence packs will do the arithmetic for you.
- Send each carrier their portal link. Open the carrier or supplier under Contacts and press Issue a link — one private link per partner, and the Portal links tab on the same screen lists every one you have issued. Email it to their transport office. They need no account and no password.
- Set up your gates. Yard & Gates → Your gates. Name them the way the site names them — "Dock 3", "Bay B", "Chilled 1" — because that is what the driver will be told.
- Design your racking. Racking & Slots → Design racking. Describe an aisle once and every slot in it is created.
- Add your people. Users & Team. Office users and managers sign in with an email; checkers, pickers and butchers get a floor login — a username, no email needed.

One thing worth getting right first time
Booking a delivery
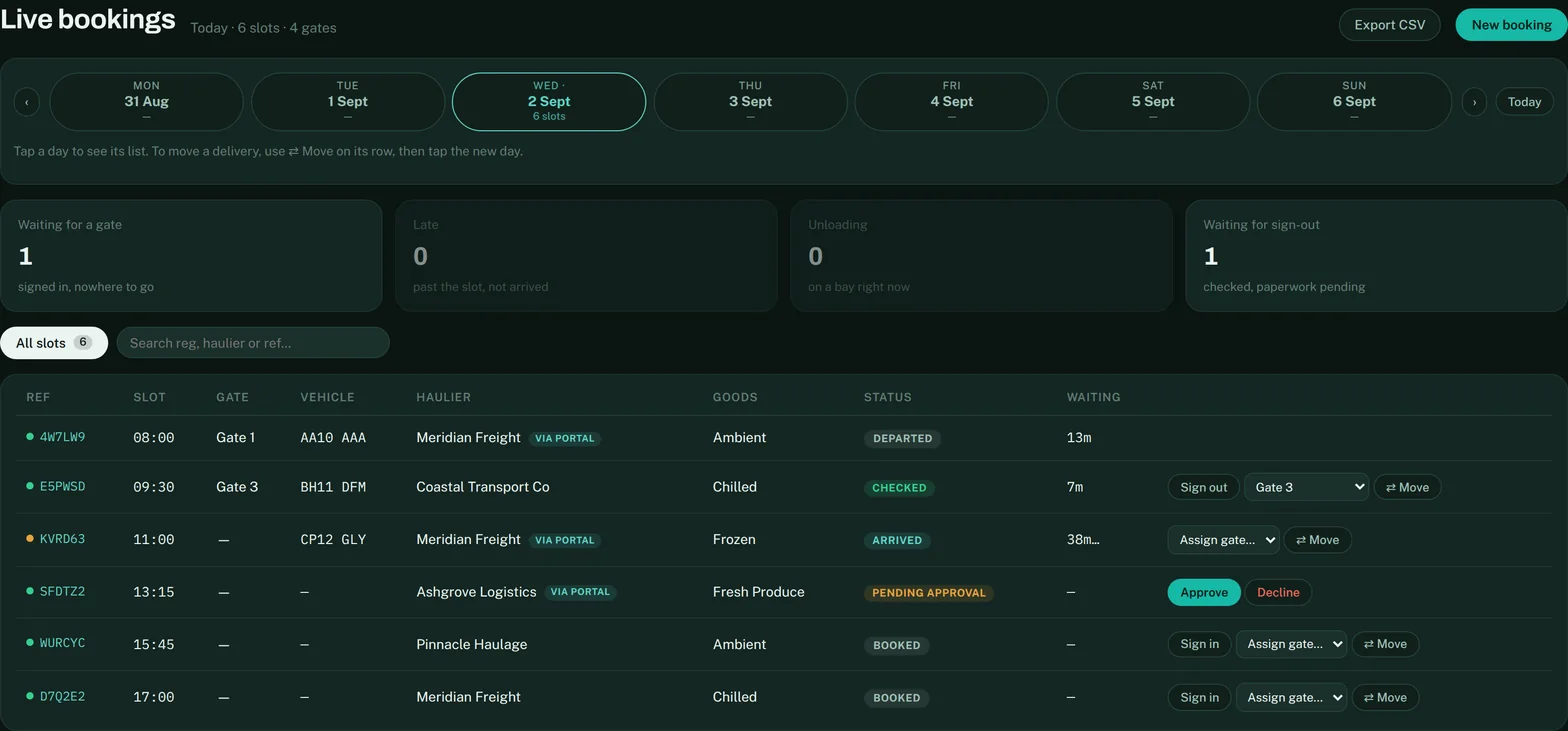
The week strip across the top marks every day that has bookings. Tap a day and the table shows it. The four tiles underneath are the whole day at a glance — waiting for a gate, late, unloading, waiting for sign-out — and tapping one narrows the list to just those.
Adding one yourself
New booking, top right. Start typing a carrier or supplier name and it suggests from your Contacts. Fill in the category and the time; the driver details you often won't have, and that is fine, because the driver fills them in when they check themselves in. The Calendar page (under your account menu) has the full calendar with published availability for planning further ahead — both write the same booking.
A week at a time, from a spreadsheet
Most sites already get their inbound schedule as a file from a customer, a planning system or a haulier — and re-keying it is the job nobody wants. Import a schedule, top right, takes that file as it is: CSV or Excel, columns matched by their heading. Date (or Date & time) and Haulier or Supplier are needed; Time, Reference or PO number, Pallets, Category, Vehicle reg, Trailer and Driver are picked up when they are there. Dates read the way they were written — dd/mm/yyyy, an Excel date, or ISO — and a date with no time lands on the 09:00 slot. You see exactly what will land on the board before anything is saved: rows already on the board (same reference, or the same partner at the same time) are left alone, rows without a readable date are counted and skipped, and your PO number stays on the booking as its own reference, searchable from the top bar.
When a carrier or supplier asks for one
They cannot book your diary. A partner with a portal link can ask for a slot, and it arrives as Slot requested on the day they are asking for, with Approve and Decline on the row. Until you approve it, it is not a booking: it is not counted, it is not on any board, and no driver can be sent against it. Approving is what puts it on the diary at the time they asked for. Declining asks you for a reason, and they see that in their portal straight away, as they see the approval. A partner asking to move a slot you already gave them shows as Move requested instead, and the original time stays in place until you answer. Anything that came in this way carries a via portal mark once it is live.
Moving one
Use ⇄ Move on the row, then tap the new day on the strip. Only people a manager has trusted with rescheduling see the button — it is handed out per person under Users & Team, and the database enforces the same rule.
When the driver arrives
PlatformYard & Gates
Print the gate sign and put it where lorries stop. It carries a QR code. The driver scans it, picks their delivery from the list, confirms their name, registration and trailer number, and they are checked in. No app, no account, and it works in eight languages so a Polish or Romanian driver reads it in theirs.
- The driver checks in. They appear as Waiting for a gate, with a clock running against them from the moment they scanned.
- You send them to a gate. Pick a gate on the booking row, or from the queue on the Yard screen. It appears on the driver's phone immediately — nobody has to walk out and tell them. Every action on the board updates for everyone within a second; nobody refreshes.
- The load is checked. A checker works through it in the checker app and photographs the paperwork.
- The office releases them. Until someone releases the driver, the record says they are still on site. If there is a discrepancy between what was declared and what came off, the release is held until someone in the office looks at it.
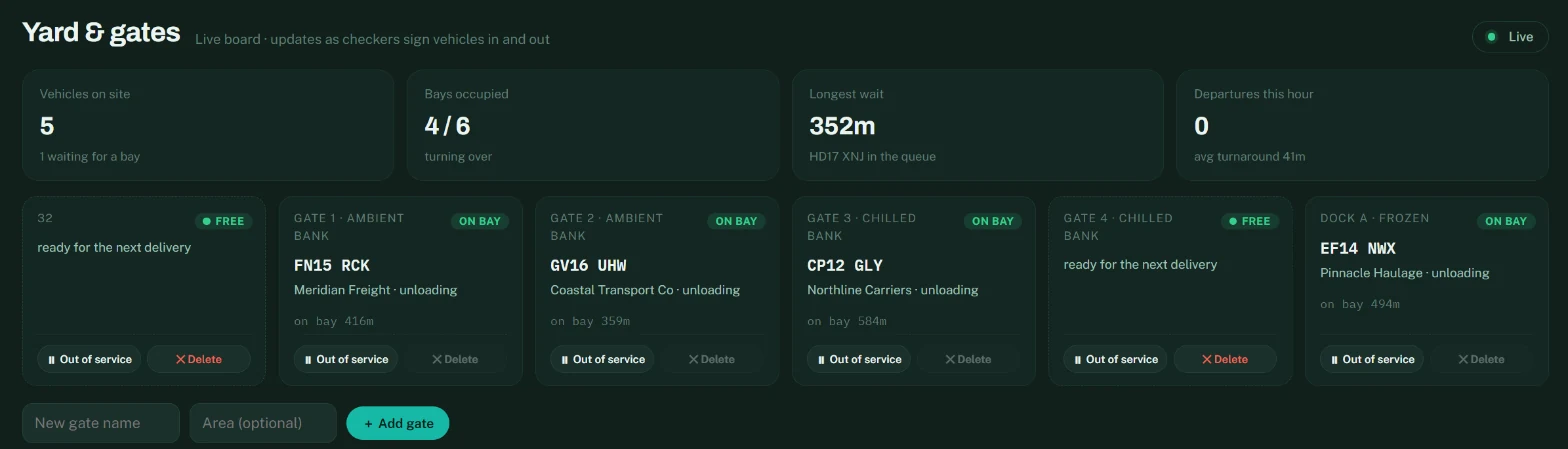
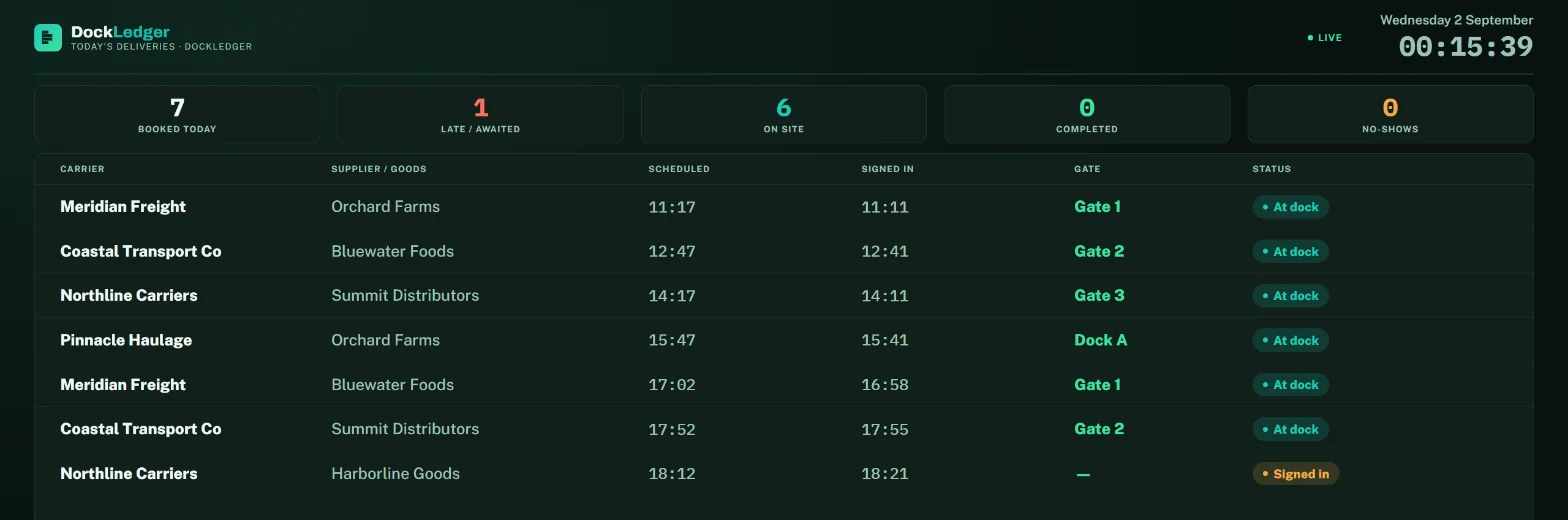
The same picture goes on a TV in the transport office with the wallboard: today's deliveries, who is at which dock and who is late, refreshing itself. It is read-only and signs in once, so it can stay on all day.
Why the waiting clock matters
Goods in, step by step
Warehouse moduleGoods In · the checker app
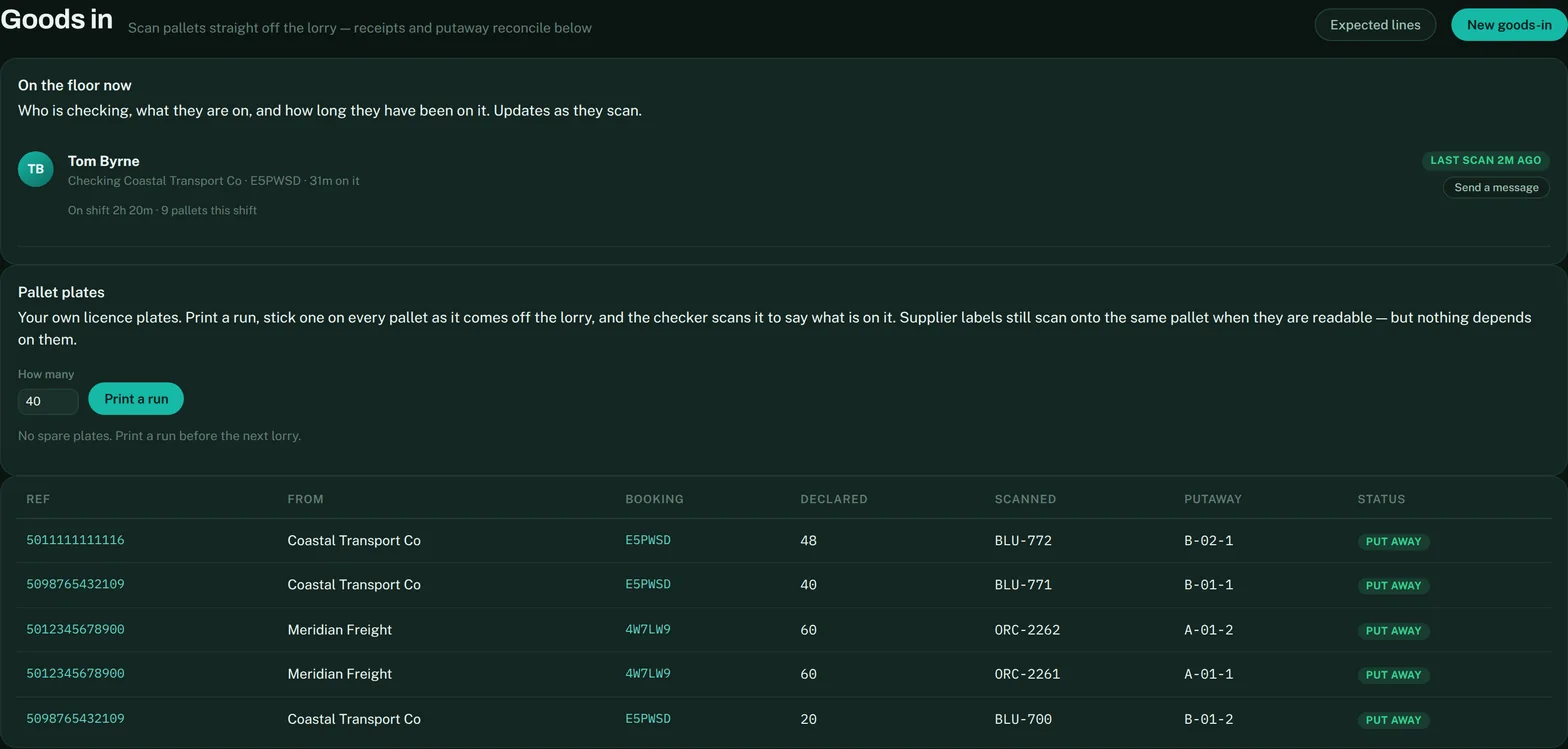
Goods in happens on the floor, in the checker app at dockledger.co.uk/checker, on a phone or a scanner gun. The Goods In screen in the console is the office's window onto it: who is clocked on, what they are checking, how long they have been on it, and every pallet as it is recorded. The two stay in step live — a scan on the dock is on the office screen before the checker has put the gun down.
Step 1 — Receive: what came off the lorry
The checker clocks on, picks the delivery, and scans each pallet as it comes off. DockLedger reads the standard GS1-128 label the supplier already prints, so the pallet number, product code, batch, expiry or best-before and case count all come off the label — nobody types them. A keyboard-wedge scanner works with no setup at all.
For suppliers whose labels won't scan, print a run of pallet plates from the Goods In screen — your own licence plates. Stick one on every pallet, scan it, choose the product from your list and count the cases. Dates that are past, or within a week, are flagged as they are added, so a short-dated pallet is spotted on the dock and not three weeks later.
Step 2 — Against the paperwork
The expected list is what should have arrived. It can reach DockLedger three ways, all from Expected lines on the Goods In screen:
- Off the paperwork. Once the checker has photographed the delivery note, invoice or CMR, choose Read this document and DockLedger reads the lines off it. Nothing saves until you have ticked each one — it proposes, you confirm.
- Pasted. Paste the rows straight out of the supplier's spreadsheet or email. Column headings are recognised automatically.
- By the carrier or supplier. They declare it in their own portal before the vehicle arrives, and it is waiting for you when it does.
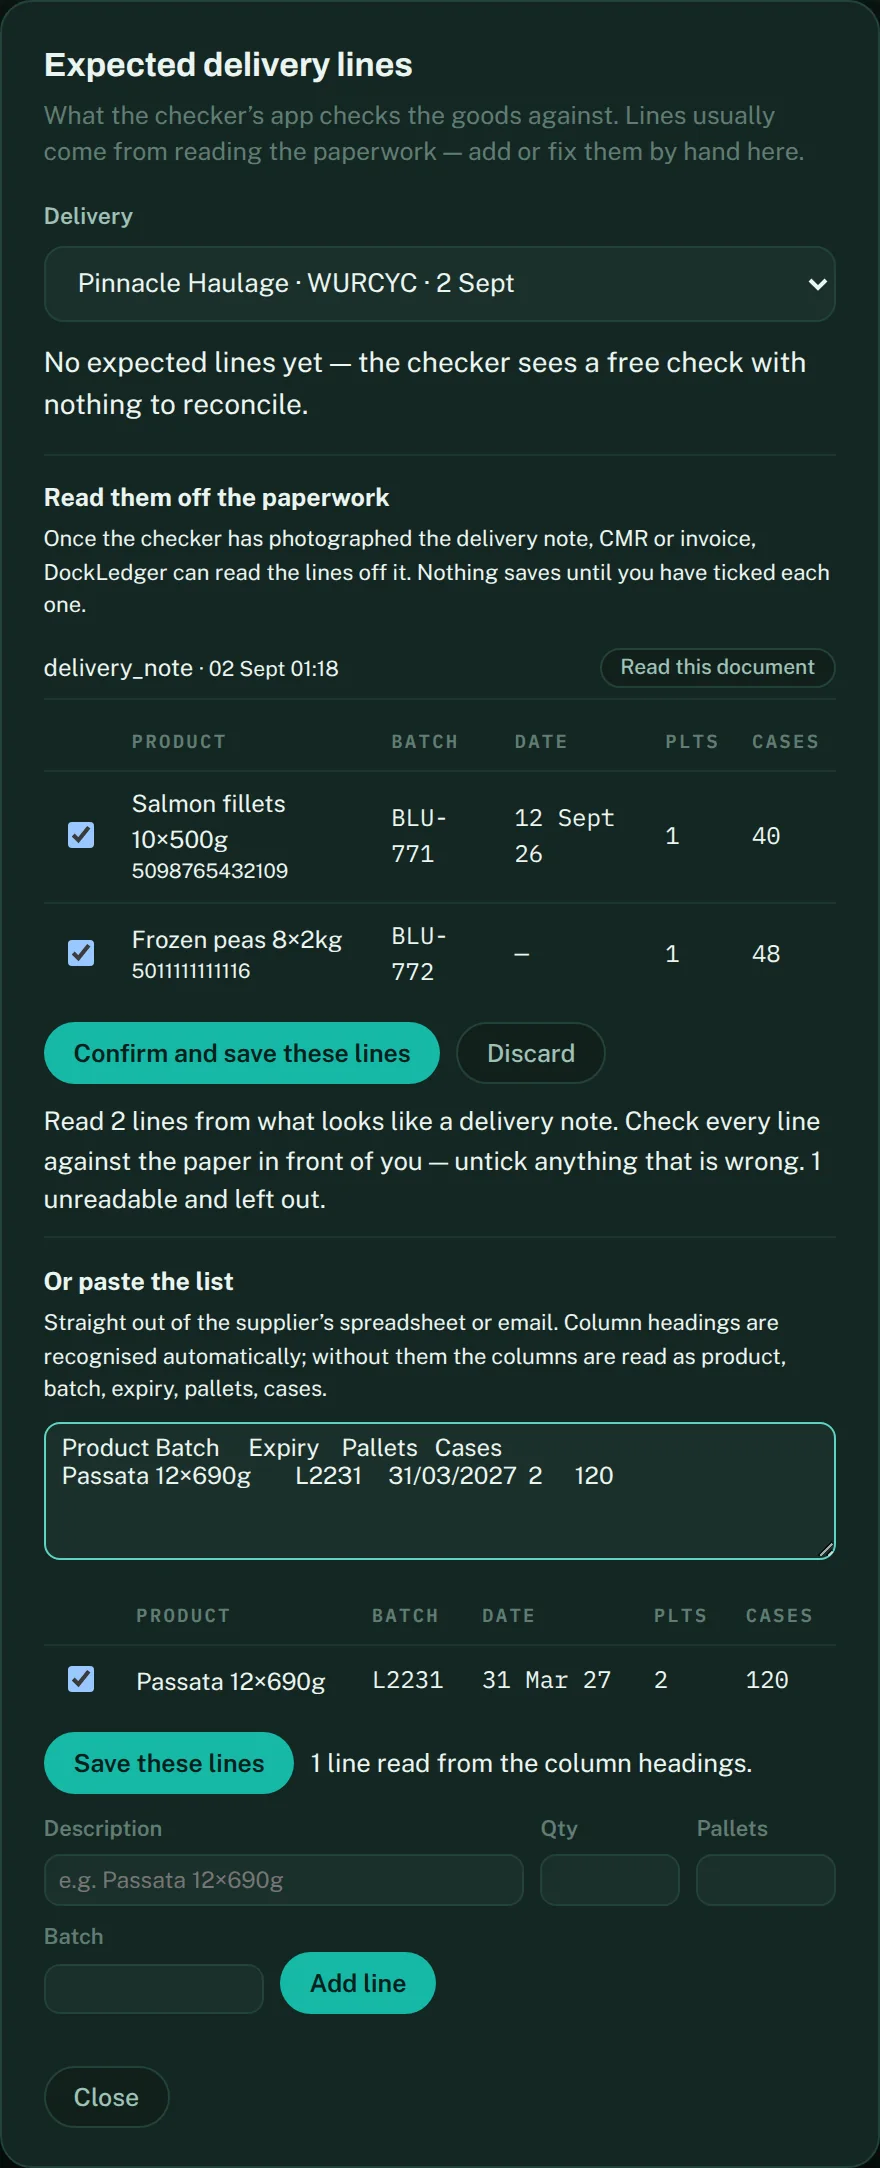
The checker sees Expected against Difference as they scan, so short, over, unexpected, or wrong batch is obvious on the dock. Matching goes strongest-key-first — pallet number if there is one, otherwise product plus batch, otherwise product — so a supplier who does not print SSCCs still reconciles.
The release gate
Step 3 — Put away: where the pallet went
The checker switches to Put away, scans the pallet, scans the slot label, and the pallet has an address. From that moment the pallet can be found, the slot knows what is in it, and the rack map knows what colour to be. Print slot labels from Racking & Slots → Print labels.
Step 4 — Pick: oldest date first
On the Stock screen, Pallet rotation lists each product with the exact pallet that should go first: first expired, first out. Where there is no expiry it uses the best-before, and where there is neither the pallet sorts last, because stock that cannot be rotated must never be proposed ahead of stock that can. Pick this records the pick and takes the cases off the ledger at that slot.
If you need a different pallet — the front pallet is damaged, the slot is blocked, the customer asked for a longer date — choose Another, pick the pallet, and DockLedger asks why, records the reason, and lets you carry on. It does not stop you working. It just makes sure the exception has a name against it. Case-by-case picking is a separate job, covered under Picking by the case.
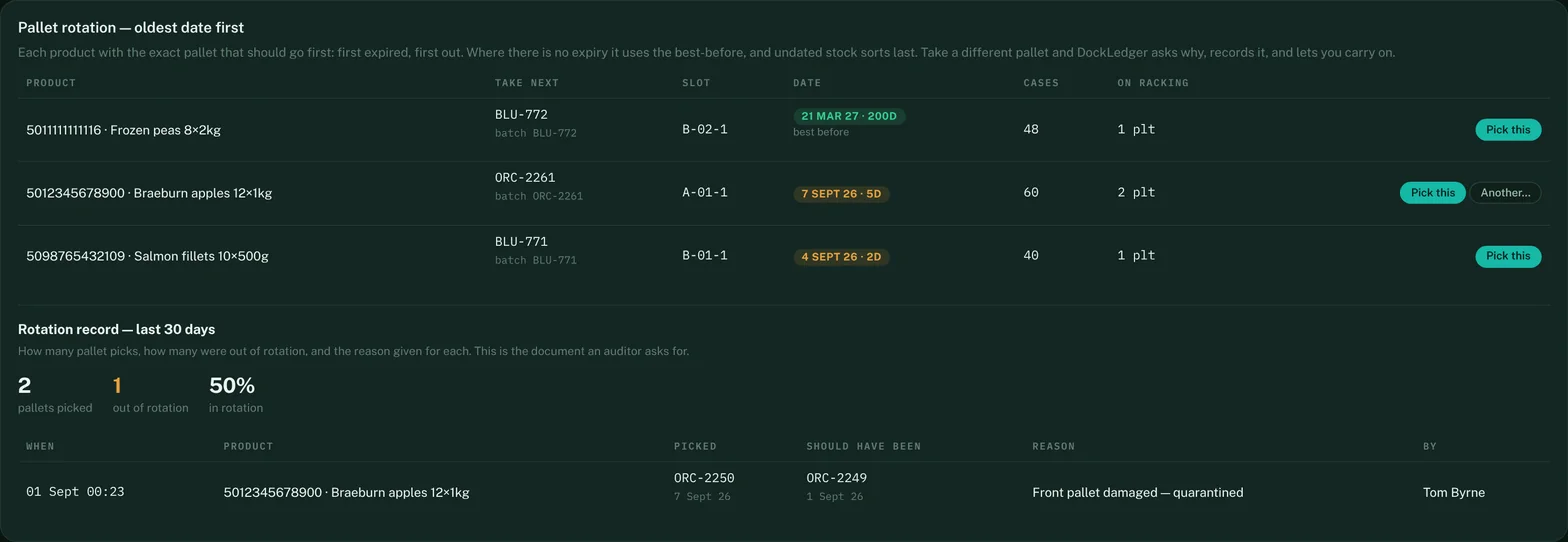
The rotation record underneath is the payoff: how many pallet picks in the last 30 days, how many were out of rotation, and the reason given for each. That is the document an auditor asks for.
Racking & slots
Warehouse moduleRacking & Slots
Building it
Warehouses have hundreds of slots and nobody is typing them in one at a time. Open Design racking, describe an aisle — how many bays per side, how many levels high, racking on the left, the right, or both — and Apply creates every slot in it, named Area-Aisle-Rack-Level to match the labels on the steel. Growing an aisle adds slots; shrinking it archives the empty ones, and a slot holding stock is never touched. Add area for a chilled store or a bonded cage.
The racking, drawn
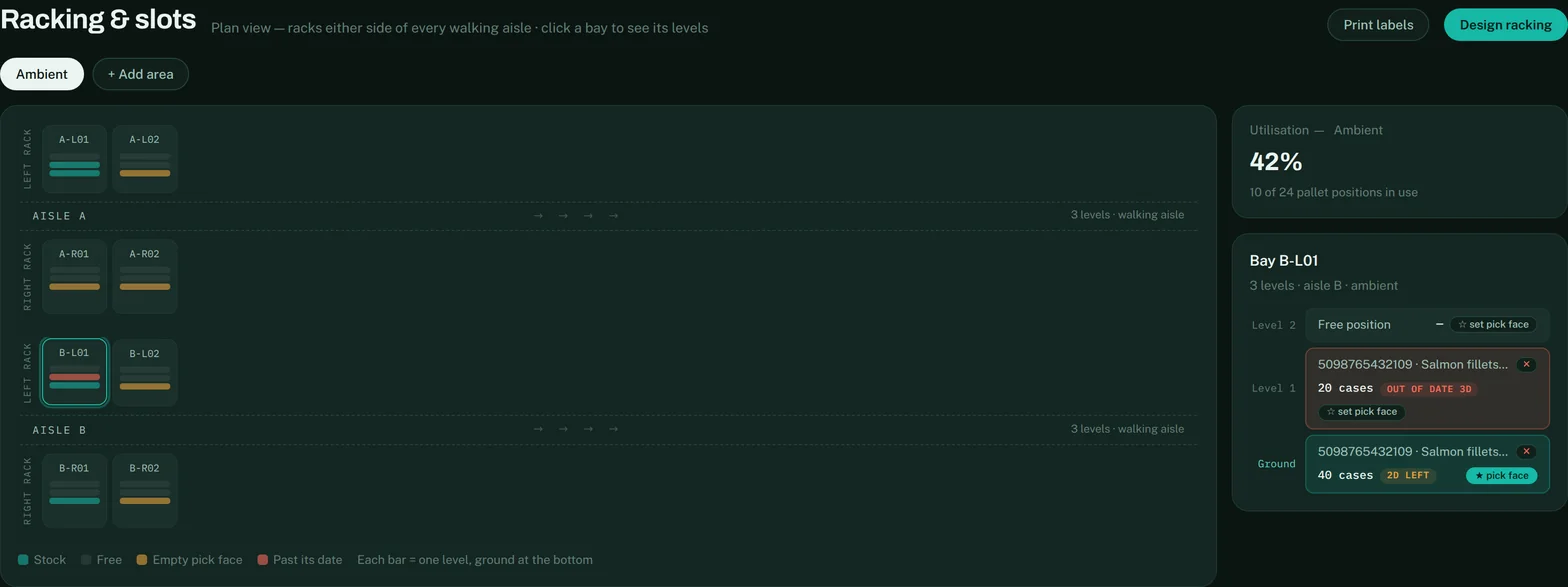
The plan is drawn the way you would walk it: you look down the aisle, with the racking on the left and right exactly where it stands, and each bay shows one bar per level, ground at the bottom. Teal is stock, grey is free, amber is a pick face waiting to be filled, and red is stock past its date — the worst news in a slot wins the colour, so one out-of-date pallet behind three good ones is still a red slot. Click any bay to see what is on each level, how many days it has left, and to mark the ground-level slot as the pick face pickers pick from. Where? on the Stock screen jumps straight to a product's slot.
Slots that have no aisle or no rack recorded cannot be drawn, so they appear in Not placed on the map rather than quietly disappearing. They still hold stock and can still be scanned — give them an aisle and rack to place them.
Who this is really for
Stock and stock takes
Warehouse moduleStock · Stock Takes
Stock is what is on the racking right now, line by line: on hand, allocated to picklists, free, and where it sits. Where? opens every slot holding that product. Underneath, Products is where a product code gets a human name, so 05012345678900 reads as what it actually is — add a product, rename one, and set its cases per pallet, which is the count the checker's app suggests when a pallet plate is scanned.
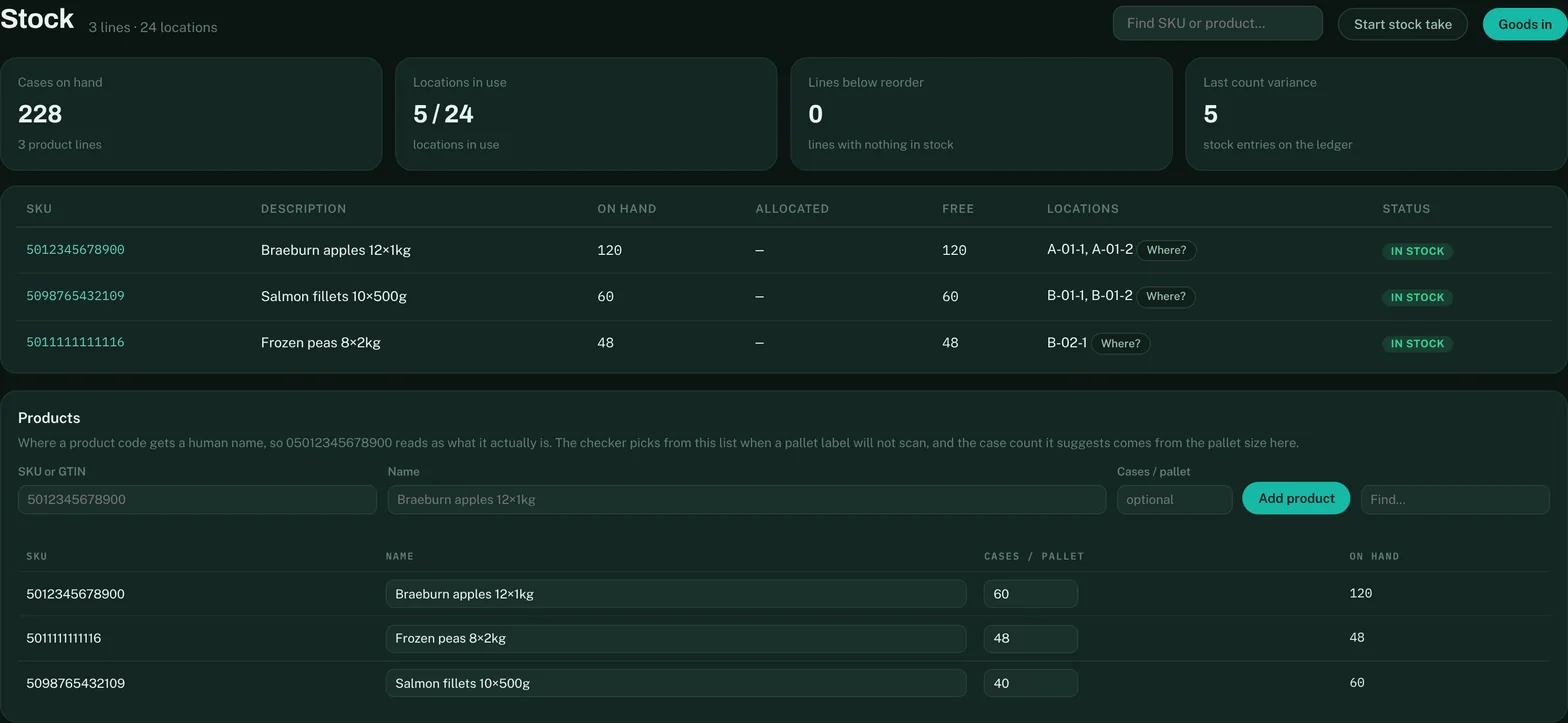
Further down: the barcode map the floor scanners resolve against, the pallet rotation described above, and Stock removed — the audit trail of every case taken off the books outside of a pick, with who, when and why. That trail is what a stock take is reconciled against.
Blind counting — the floor counts, the office watches
For a proper stock take, start a count session from the Stock Takes screen: give it a name and choose the scope — the picking faces (plus anything already flagged as suspect), or the whole warehouse. Whoever is counting opens dockledger.co.uk/count on a tablet or scanner gun, using the same simple username login as the checker and picker apps. The counting app is blind on purpose: it shows each slot and what product should be in it, but never how many — the counter types what is physically there, with no number on the screen to anchor to.
Back in the office the session screen fills in live: an overall percentage counted, progress aisle by aisle, and as counts land, a variance review sorted worst-first. Close the session and every variance is kept on record. The picking faces are where the scope earns its keep: reserve stock behind a scan trail rarely drifts, but a pick face is touched dozens of times a day, and that is where mistakes — and theft — show up first.
Picking by the case
Case picking modulePick Board · the picker app
Pallet picking moves whole pallets. Case picking is the other job: someone walks the aisle with a scanner and takes twelve cases off one pallet, eight off another. DockLedger runs that end to end.
Set it up once
Three things make it work. Pick faces — on the rack plan, click a bay and mark the ground-level slots pickers actually pick from. Case barcodes — map each product's case barcode to the product in the barcode map on the Stock screen, per company, because two suppliers can use the same code for different things. Lanes — name the marshalling lanes where picked stock is staged before it goes out the door, on the Transport screen.
Build a picklist, hand it to a picker
Supply chain builds the lists in the Picklist Builder in the Supply chain suite — a product-first screen showing every product with its live position: pallets on site, cases in the pick faces, the next expiry date, filterable by name or SKU. Add cases straight from the table, point the list at a lane, and it lands on the Pick Board as Queued. Assign a picker from the card and it is on their phone. Pickers sign in with the same simple username logins as checkers: no email address, nothing to set up on the device.
The picker app
Pickers work in their own app at dockledger.co.uk/pick — built for a phone or a scanner gun, not a desk. Each line tells them the slot — the pick face holding the oldest date. There is nothing to choose: scan a case and the line is counted and ticked off, always deducting oldest-date-first, and only ever from a pick face — the system refuses a pick from reserve. If the stock is not there, the picker records a short instead of silently moving on — and the office sees it. As they build pallets they tap Record a pallet, and the board counts the pallets wrapped.
Why the deduction is automatic
The Pick Board
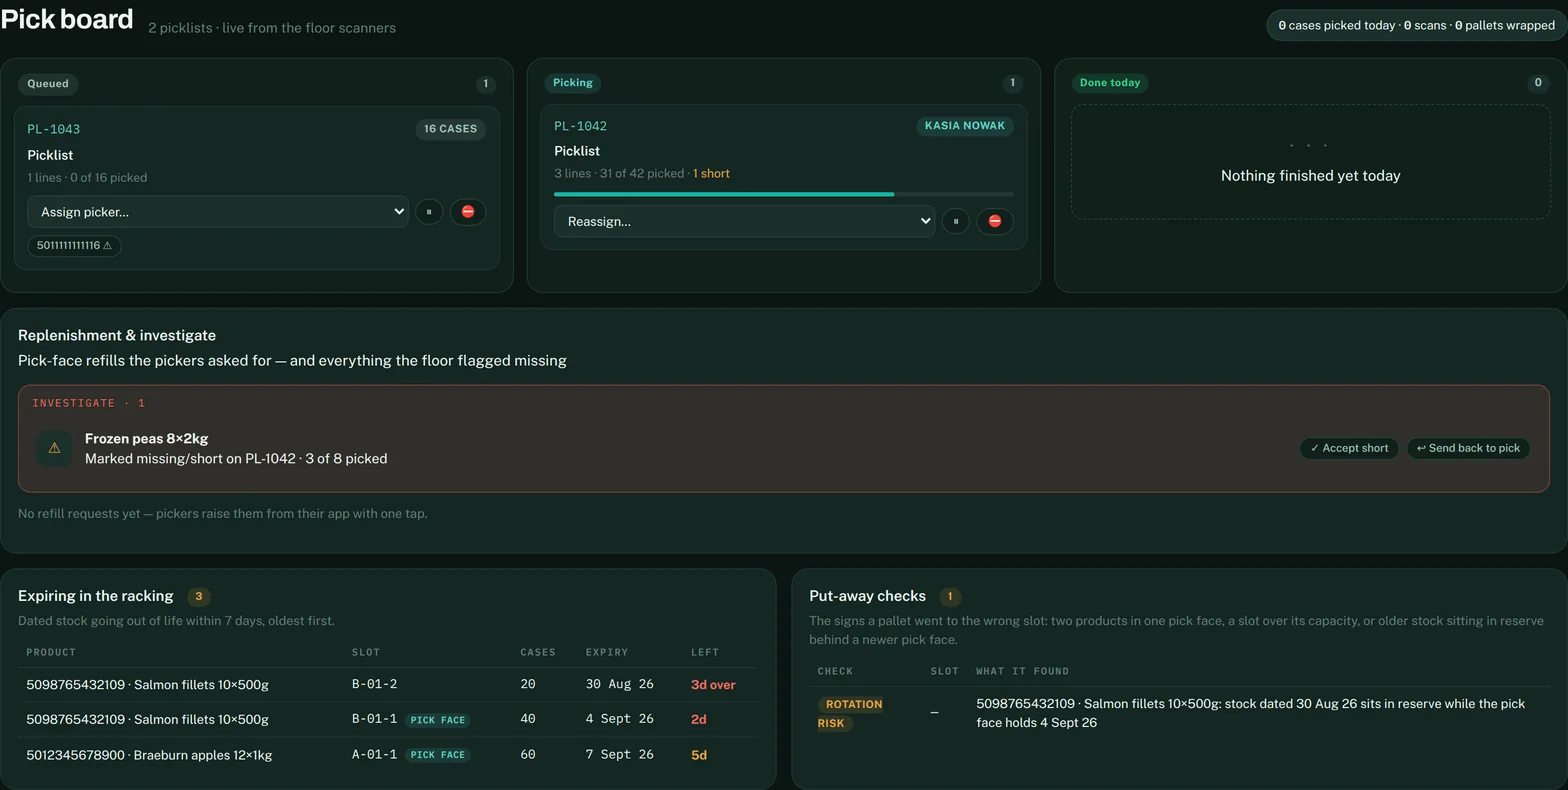
Whoever runs the floor gets their own screen: every picklist today in Queued, Picking and Done columns with live progress, reassign a picker mid-shift, and Replenishment & investigate underneath — pick-face refills the pickers asked for, and every short waiting on a decision. Accept short ships the order with what was picked; Send back to pick puts the line back on the picker's phone. Two watchdogs sit at the bottom: Expiring in the racking lists dated stock going out of life within 7 days, and Put-away checks flags the signs a pallet went to the wrong slot — two products in one pick face, a slot over its capacity, or older stock in reserve behind a newer pick face.
Suites — one screen per job
From Users & Team, an owner or manager can lock a team member to a suite — just the screens their job uses. Someone on the Picking suite signs in straight onto the Pick Board; the Supply suite gets the Picklist Builder, buying and stock; the Transport suite gets the lane board and dispatch. It works on the floor logins too: a picker's username opens the picker app and not the checker app, and neither opens the office console.
Paperwork & evidence
Deliveries & evidence moduleDeliveries & Paperwork
Every delivery a checker has been through lands here, with the photographs they took of the delivery note, CMR or invoice. You can view the paperwork, see how long the check actually took, and release the driver once you are happy.
Waiting-time evidence packs
Pick a carrier and a date range and DockLedger builds a pack: every delivery, when the driver checked in, when they got a gate, when they left, and how much of that was over the free time you agreed with that carrier. It uses the free time and detention rate you set against them in Contacts, so the arithmetic is theirs, not yours.
It is a PDF. It goes in an email. It ends the conversation.
The carrier & supplier portal
Carrier & supplier portal moduleContacts
Each carrier and each supplier gets one private link. Send it to their office and they can do their own admin without ringing you and without an account. The link is the credential, so treat it like one — only owners and managers can see or copy it.
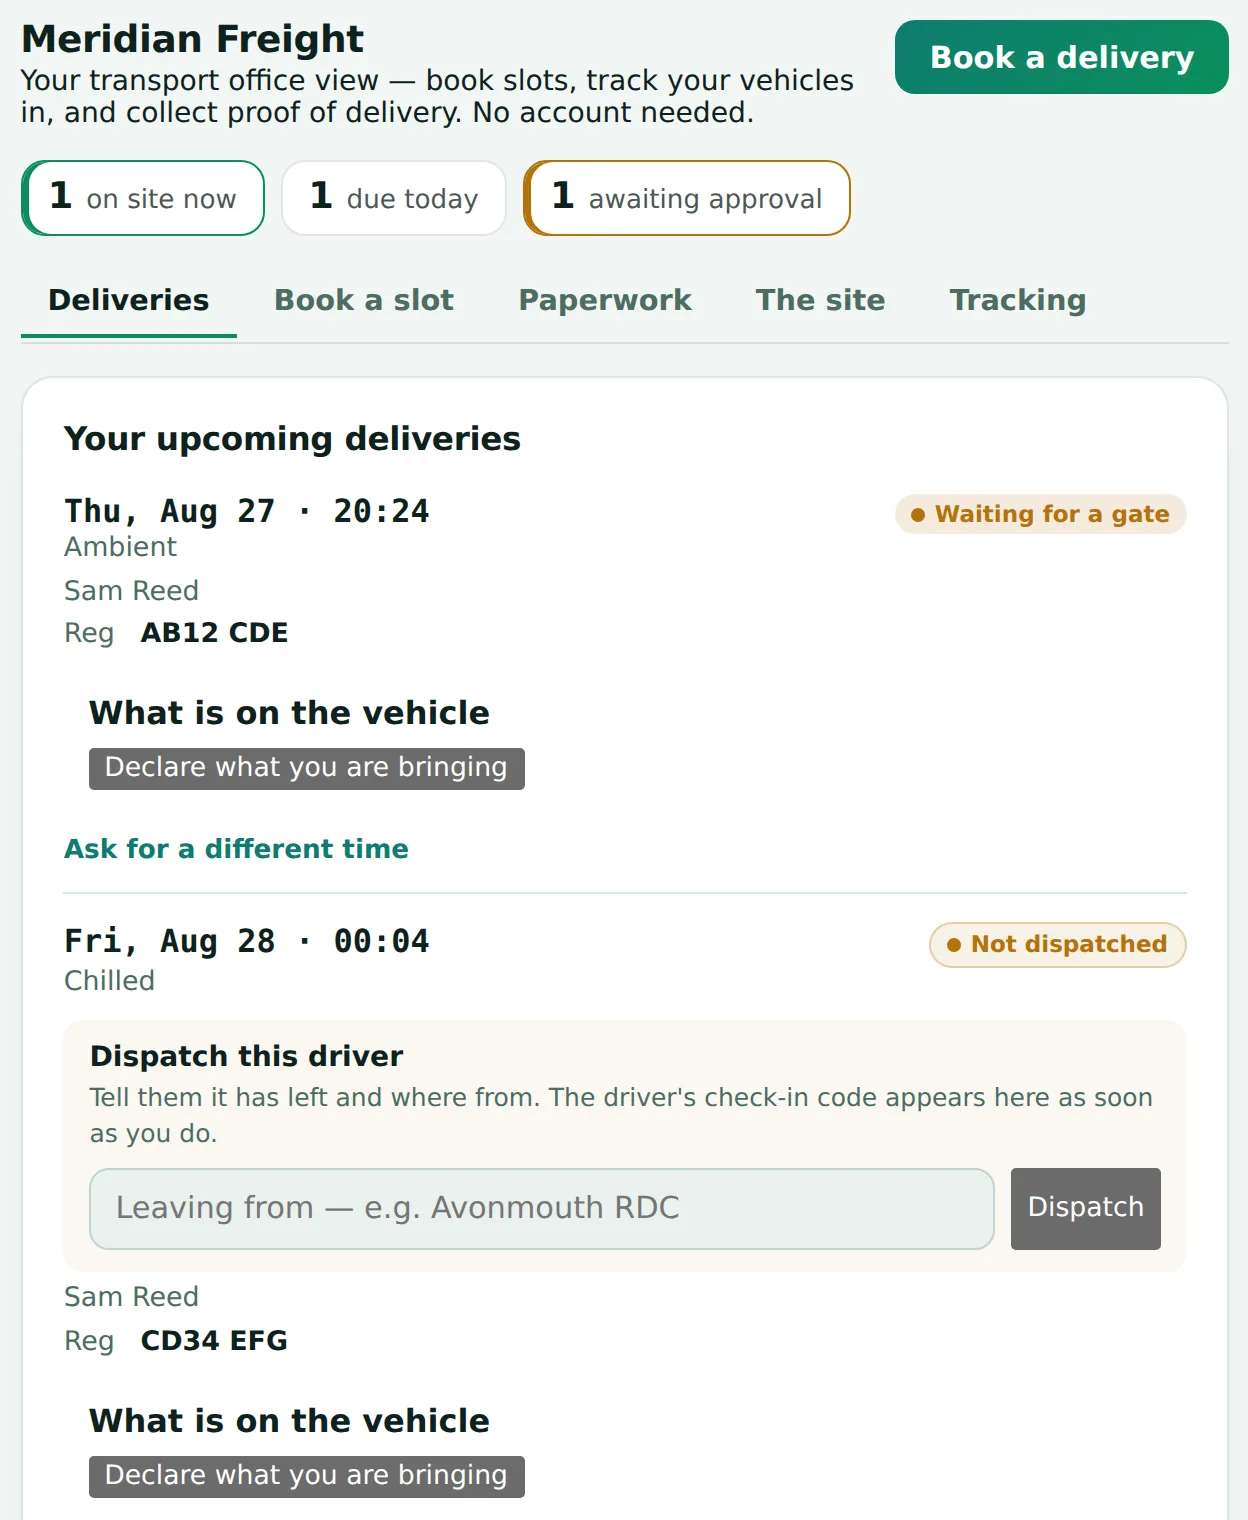
The two links look the same and do the same things, but they show different deliveries. A carrier sees the deliveries it is carrying. A supplier sees the deliveries its goods are on, whoever is driving them. Neither can see the other's. That is decided on the server from the link itself, not by anything the page does, so it holds however the link is used.
From the portal either of them can:
- See every delivery of theirs — due, on site, or finished — and its live status.
- Say the load has left, and where from.
- Propose a new slot against your published availability, for you to approve.
- Declare what is on the vehicle before it arrives.
- Dispatch a driver, which produces the driver's check-in code.
- Collect proof of delivery once the load is done.
- Share vehicle location, if they choose to.
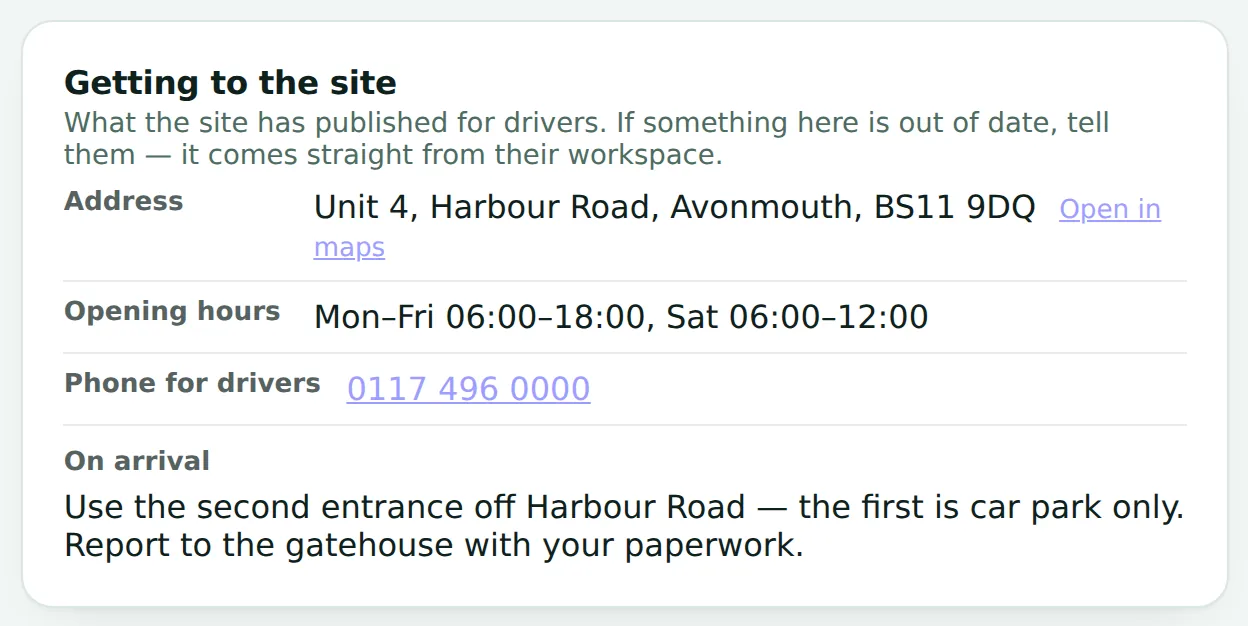
The address, hours, phone number and arrival notes shown there come from Site & arrival → What carriers need to know in your console. Change them once and every portal shows the change.
One vehicle, several suppliers
The portal is in eight languages — English, Polish, Romanian, Spanish, German, French, Dutch and Italian — and so is the driver check-in.
For your partners, in their language
The portal and the driver check-in are in eight languages; this is the written guide to go with them. Send the page, or paste the section, to a carrier's transport office, a supplier's despatch desk or a driver — in the language they read.
Using your DockLedger portal
The site you deliver to runs DockLedger. Your link opens a page that is yours alone — no account, no password. This is what it does, and what the driver should expect at the gate.
For the transport office or despatch desk
- Your link is your key
- It opens only your own deliveries. Do not forward it or post it anywhere; if it leaks, ask the site to issue a new one.
- Your deliveries
- Every one that is due, on site or finished, with its live status — booked, waiting for a gate, unloading, released.
- Ask for a slot
- Pick a day and time from the site's published availability. The site approves it, or suggests another, and you see the answer here.
- Declare the load
- Paste or type what is on the vehicle before it arrives — product, batch, dates, pallets, cases. The site checks the goods against it when the lorry lands.
- A shared vehicle
- When several suppliers' goods travel together, you see and declare only your own lines. Nobody else on the lorry can see them.
- Dispatch
- Say the load has left and from where. You get the driver's check-in code to pass on.
- Proof of delivery
- The pallet count and the photographed paperwork come back to this page the moment the site releases the driver.
- If the link stops working
- It has expired or been withdrawn. Ask the site for a fresh one — nothing else is needed.
For the driver
- At the gate
- Scan the QR code on the sign with your phone's camera. No app to install.
- Choose your language
- The page is in eight languages. Pick yours at the top.
- Check in
- Enter the check-in code your office gave you, or the vehicle registration, and confirm the pallet count if asked.
- Wait to be called
- Stay with the vehicle. Your gate or bay number appears on the phone when it is ready — no need to find the office.
- Before you leave
- The site signs you out when the check is done. Your office receives the proof of delivery automatically.
Translations are drafted by the DockLedger team and read through by native speakers. If a line reads wrong, tell us at hello@dockledger.co.uk.
Customer orders
Orders moduleOrders · Contacts
Your customers order from you online instead of ringing. Each buyer gets a login of their own — not a link — at dockledger.co.uk/orders. They see your name, your products at their prices, their own order history, and every delivery note with the signature on it. Nothing else of yours.
Giving a customer access
- Contacts → open the customer → Customer portal → type the buyer's email and name → Give portal access.
- The link is copied for you. Send it; it works for 14 days. The buyer chooses their own password and lands straight in the catalogue.
- Remove a login from the same place the day they stop being a customer.
What happens to an order
- It arrives under Orders as Waiting. Confirm it (one click) or decline it with a reason the buyer sees.
- Release to picking puts it on the pick board as an ordinary picklist. Mark despatched attaches the despatch, and the buyer sees the note and the signature.
- The office takes phone orders on the same pad with New order. Prices come from Price lists: one list price, and a per-customer override that wins.
- Prices are as you hold them. Meat is sold by weight, so the buyer is told the invoice reflects actual weights.
Accounting, EDI and webhooks
All under Orders → Integrations — Sage 200, Xero, QuickBooks, the orders API and webhooks. See Integrations and webhooks.
Why a login and not a link
Buying and purchase orders
All plansBuying
Buying is the buying team's page in the console, in three tabs. It replaces the Buying, Purchase orders, Suppliers and Portal links pages of the old Supply chain suite; the calendar, stock, picklist builder, analytics and weekly digest stay there, one click from your account menu.
Purchase orders
A purchase order here is the operations copy of what you asked a supplier for — product, how many, and when you were promised it. No prices; that stays in your accounts system. Raise one with New order, or straight from the What to order tab. Click an order to send it: Copy as text for a phone call or a chat, Email the supplier when their address is on the contact card. Then mark it sent, running late (with a reason and a new date), or cancelled.
The order and the delivery are one thing
An order gets onto the dock one of four ways, and they all end in the same place. Book the delivery on the order puts an approved slot on Live bookings. Link a booking on the board ties it to one that is already there. A schedule you import with the PO number in a column links itself. And the supplier, on their own portal, sees their open orders and asks for a slot against one — the request arrives on your board already carrying the PO number. However it got there, the delivery's expected lines are filled in from the order, so the checker at goods in reconciles the goods against what wasbought, not a blank sheet; if the supplier then declares the load with batches and dates, their declaration replaces the seeded lines and keeps the order's reference. The lorry signing in at the gate marks the order landed by itself. The Delivery column on the order list says where each one is — not booked, slot requested, booked, on site, delivered — and the tiles at the top are read from the dock, not from memory.
The supplier confirms before anything is booked
Every open order sits on the supplier's portal with its lines. They confirm the quantity they will actually send per line, a promised date and a note. On your side the order shows Confirmed by … for Tue 15 Sep, each line shows Ordered, Confirmed and — once the bench has checked the lorry — Received, and the header carries the fill rate. A supplier who confirms short is a short you know about days before the lorry, not at the gate.
What to order
Usage is measured from what pickers actually took in the last 28 days, so a product with no movement says no usage yet rather than inventing a forecast. Days of stock is what is on the floor divided by that rate; the suggested order covers the next 28 days less what is already on the floor and less what is already on an open purchase order. Order it opens a new order with that line filled in.
Suppliers
One row per supplier: OTIF over the last 30 days (arrived within ten minutes of the slot and nothing short), a grade from A to D, how many of their bookings they raised themselves through their portal link, lateness, shorts, fill rate (cases ordered against cases scanned in on landed orders), how often they confirm orders on the portal, open orders and the last delivery. Click a row to open the supplier's card, where their email and portal link live.
Collections and despatch
Orders · WarehouseOrders · Live bookings
The dock diary runs in both directions. A confirmed customer order gets Book the collection: pick the time, the haulier and the vehicle if you know them, and an outbound slot lands on Live bookings with an OUT badge, carrying the order reference. The customer sees the collection on their portal straight away.
The loading check
- When the lorry is on the bay, open the order and press Loading check. Every line is listed with what was ordered and what the pickers took; type what actually went on.
- Anything under the order is recorded as a short against that line, with the count on the despatch. The pick, if still open, is closed by the lorry leaving.
- Confirm and the despatch is minted (D-reference), the order is Despatched, the collection booking is marked loaded, and the customer's portal shows the despatch, the shorts and what was sent against each line.
- Loads without an order still go the old way — Despatch on the picklist — and the delivery note and the signature work the same.
Integrations and webhooks
Orders moduleOrders → Integrations
Accounting systems
Sage 200, Xero and QuickBooks each have a tab. Create an app in that system's developer portal with the redirect URL the tab shows, paste its client ID and secret once — they go into the vault and are never shown again — and press Connect. Sign in to the accounting system, and you land back in the console connected. Confirmed orders go out as sales orders (Sage), draft invoices (Xero) or estimates (QuickBooks); customers and item prices come back nightly, or on Sync now. Everything that went out or came in, with its retries, is on the Activity tab. Disconnect stops the flow; nothing already sent is touched.
The orders API
For an EDI hub or a customer's own system. Create a key — shown once — and they post orders to the orders API; a key tied to one customer can only order for that customer. The request format is on the tab.
Webhooks
The other direction: your WMS, TMS or ERP is told the moment something happens on the dock. Add an endpoint (https only), tick the events — everything, or a slot requested, approved, declined or moved; a vehicle dispatched, arrived, at the gate, checked, released or departed; a no-show; order and purchase-order events — and copy the signing secret, shown once.
- One signed POST per event. Verify X-DockLedger-Signature: HMAC-SHA256 of timestamp + '.' + the raw body, with your secret. Reject anything older than five minutes.
- Answer 2xx within ten seconds. Anything else is retried with backoff for eight tries, then marked dead; the last five deliveries per endpoint are on the tab with a Retry button.
- An endpoint that fails fifty times in a row is paused by itself. Send test fires a ping so the other side can check its plumbing before anything real happens.
- Rotate the secret whenever a person who knew it leaves; the other system must be given the new one before the next event.
My view and Reports
All plansOverview → My view · Reports
My view
Your own home screen, under the Overview. Press Choose panels and tick what your job needs first thing: inbound today, on site now, late today, slots to approve, POs the supplier has not confirmed, orders to confirm, picks in progress, expiring stock, next vehicles due, and more. Each tile opens the page behind it; amber and red mean it wants a look. The arrangement is yours alone — the rest of the team keep theirs — and it refreshes every minute while it is open.
Reports
- Rotation: pallets picked, how many broke first-expired-first-out, by reason and by person, week by week — and the last fifty breaks, took-versus-should with the dates. This is the auditor's page.
- Shorts: inbound loads by supplier — pallets declared against pallets counted at the bench, with a week-by-week trend — and despatches by customer that left with a line under the order.
- Purchase-order fill: per supplier, orders, landed, how often they confirmed on the portal, how often the lorry came on the promised day, and cases ordered against cases scanned in.
- Pick the range at the top (30 days to a year) and Export CSV for whichever tab is open.
Meat traceability
Meat traceability moduleTraceability
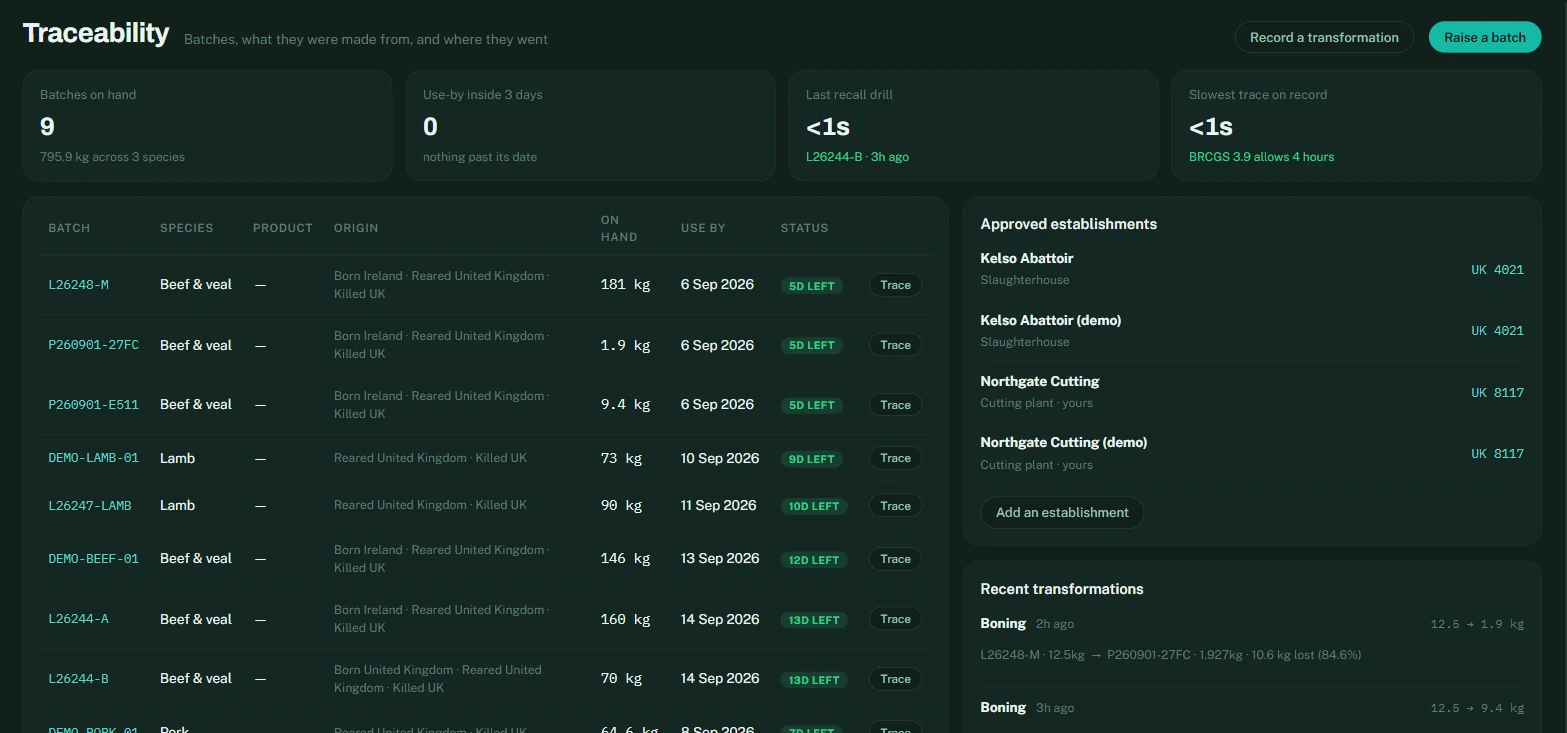
A cutting plant has to answer one question fast: this pack on the shelf — which animal batch did it come from, and where did the rest of that batch go? DockLedger keeps that chain as things happen rather than reconstructing it afterwards. A batch comes in with its origin declared, every case gets its own label, every cut or mince is recorded as a transformation, and every finished pack carries the batch forward.
Raising a batch
- One species, one batch. Beef, lamb or pork — never mixed. Beef is checked against the three-plant limit; minced beef must come from a single origin. The form refuses anything that would not pass an audit.
- Origin is three declarations — born, reared, slaughtered — plus the slaughterhouse and its approval number. They print on every label from that batch, so they are worth getting right once.
- Approved establishments are kept once, under the batch list: your own cutting plant and the abattoirs you buy from, each with its UK approval number.
Cases at goods-in
When a batch arrives, the checker labels it: scan the supplier's GS1 barcode if there is one, pick the batch (or several, when a box carries two or three tracing codes), type the weight of each case, and print. Every case gets a DockLedger code that the butchery app and the bench station scan later. Cases with different weights are the normal case, not the exception.
Where it came from
A batch carries its supplier and the batch reference printed on the supplier's own label. That is the step back that Article 18 asks for, and it is the line an auditor reads first on a trace sheet: not just who you sold it to, but who sold it to you, and under what number in their system.
Sending it out
Despatch happens at the bay, so it happens on a phone. The loader opens /load, taps the customer, and scans each box as it goes on the vehicle. The running count and weight stay on screen, and nothing is sent to DockLedger until the load is complete — so a load can be built, corrected and rebuilt without leaving a half-finished despatch behind.
A box that must not leave stops the loader there, at the tailgate, and says why: already despatched to someone else, out of date, cut down in butchery, or from a batch on hold. That is the point of holding stock rather than emailing about it.
Holding and recalling a batch
Press Hold on any batch and say why — the reason is compulsory, because it goes on the batch's event trail with your name against it. From that moment the batch cannot be despatched and cannot be cut: both doors are shut in the database, not just greyed out in the app. Tick confirmed recall when it is a real recall rather than a precaution, and the batch is marked as such everywhere it appears. Office staff can hold; only an owner or manager can release, because deciding stock is safe again is a different kind of decision from stopping it.
Recall drills
Press Trace on any batch and DockLedger walks the chain both ways — back to the animals it came from, forward to every pack made from it — and times itself doing it. The result is a printable report with a mass balance: what came in, what went out, what was lost to trim, and whether the numbers reconcile.
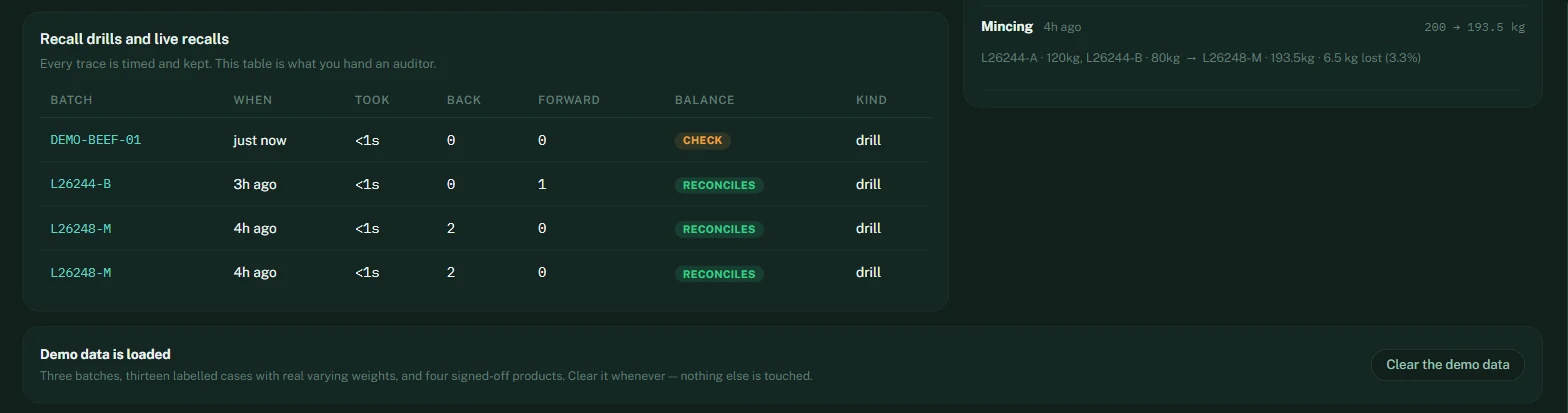
Run a drill every month
Butchery and labels
Meat traceability modulecut.html · label designer
Finished products are written once
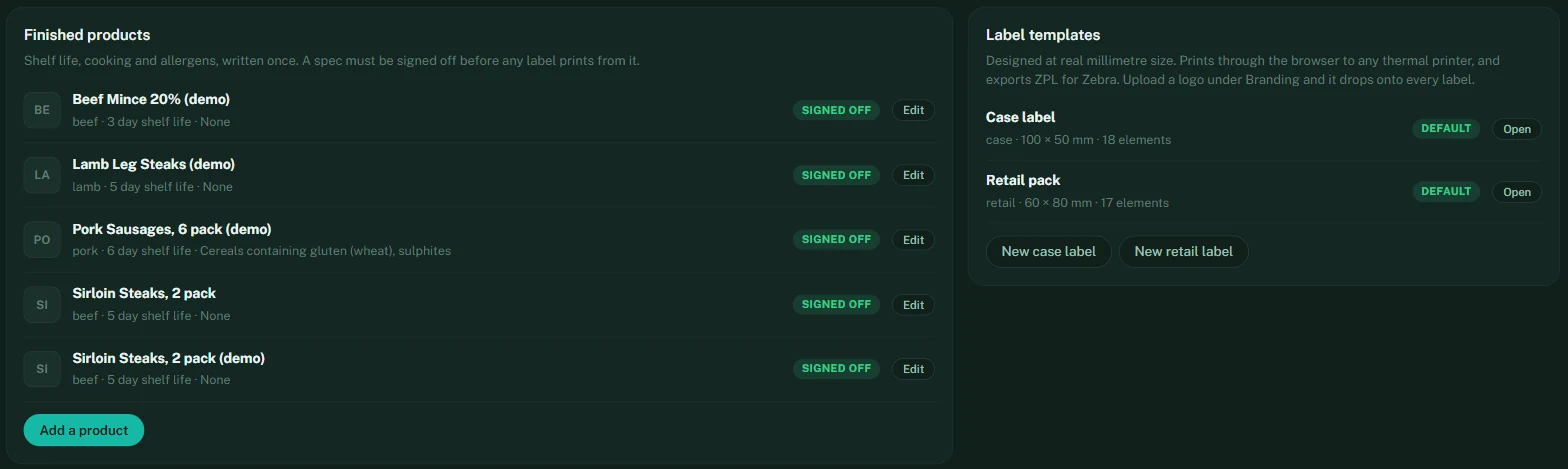
Under Traceability, the office keeps a spec for every finished product: species, shelf life, storage, cooking instructions, allergens, and a photo for the bench tiles. A spec must be signed off before a single label prints from it — so whoever is responsible for what goes on the pack is the one who approved it, not the person standing at the bench.
The butchery app
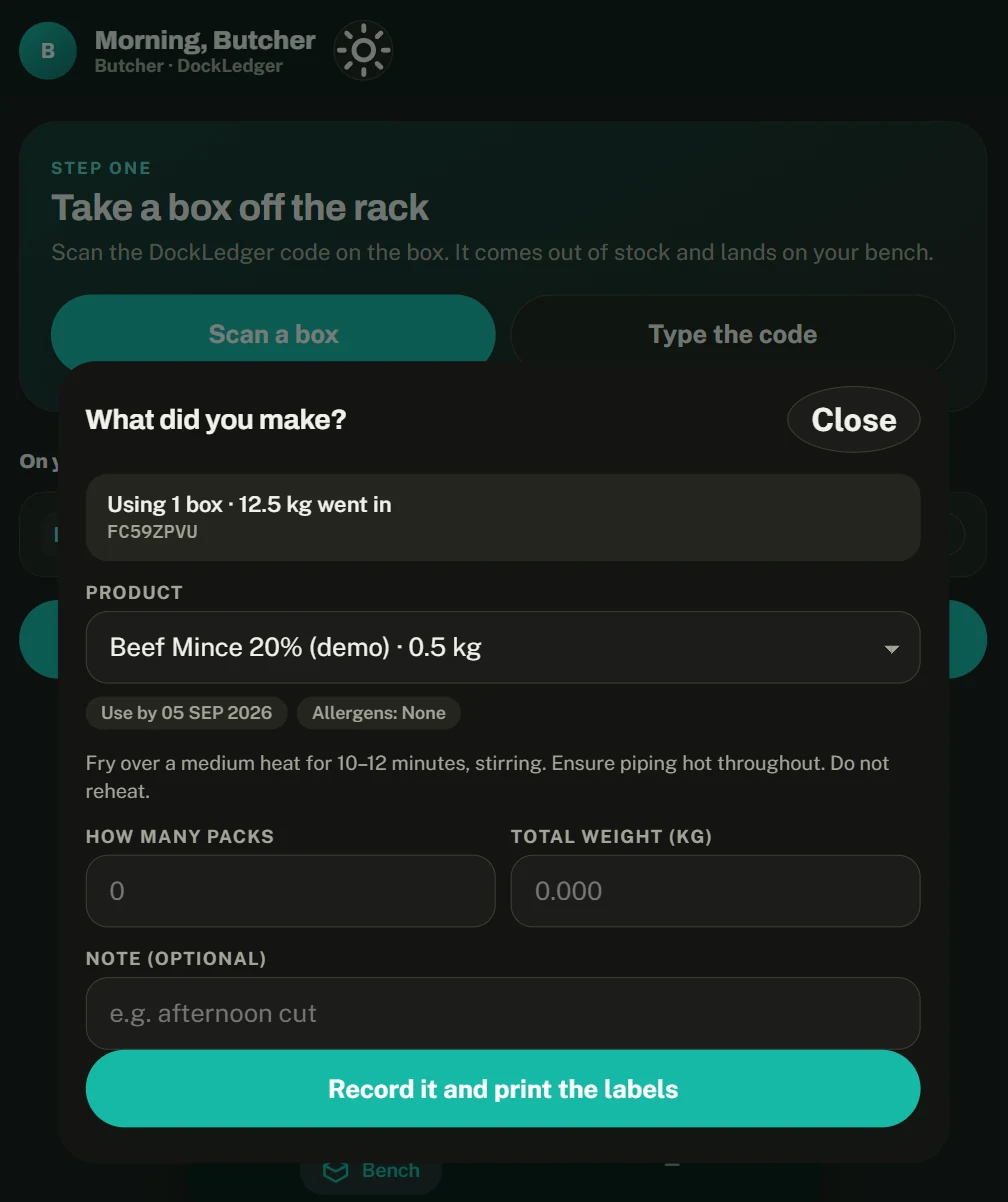
The butcher opens the app on a phone, scans the box coming off the rack (it leaves stock and lands on their bench), taps what they made, and says how many packs and the total weight. The labels print with use-by, cooking and allergens filled in from the spec, the weight split across the packs, and the batch carried forward. Nothing is typed unless the scanner fails.
Designing your labels
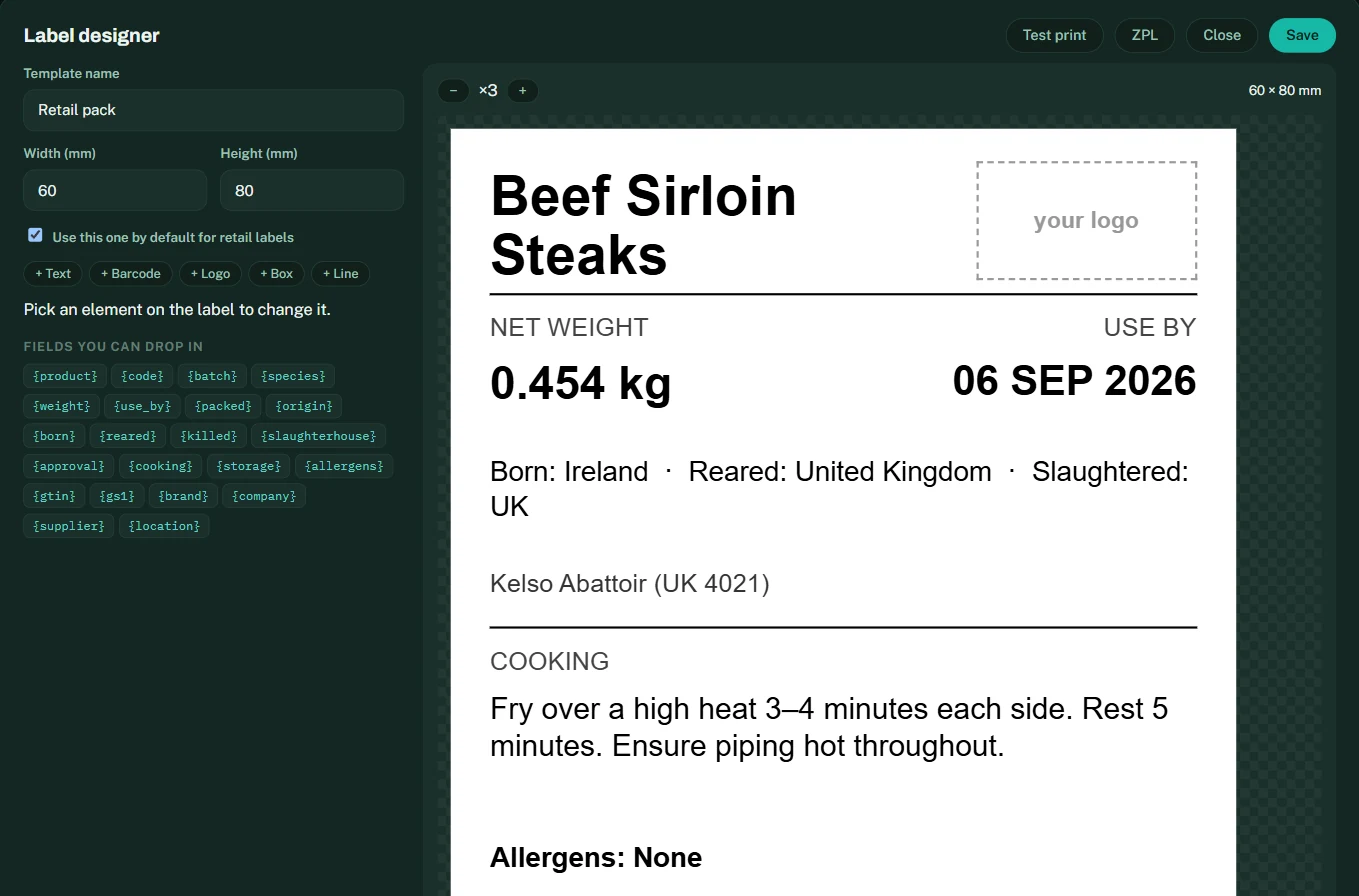
Labels are designed at real millimetre size inside the app. Drop in the fields you need — product, weight, use-by, origin, cooking, allergens, the GS1-128 barcode — move them where you want them, and upload your logo under Branding so it lands on every label. Test print goes to any thermal printer through the browser; ZPL exports for Zebra printers. One template is the default for case labels and one for retail packs.
The bench station
Meat traceability modulestation.html · £89 per bench
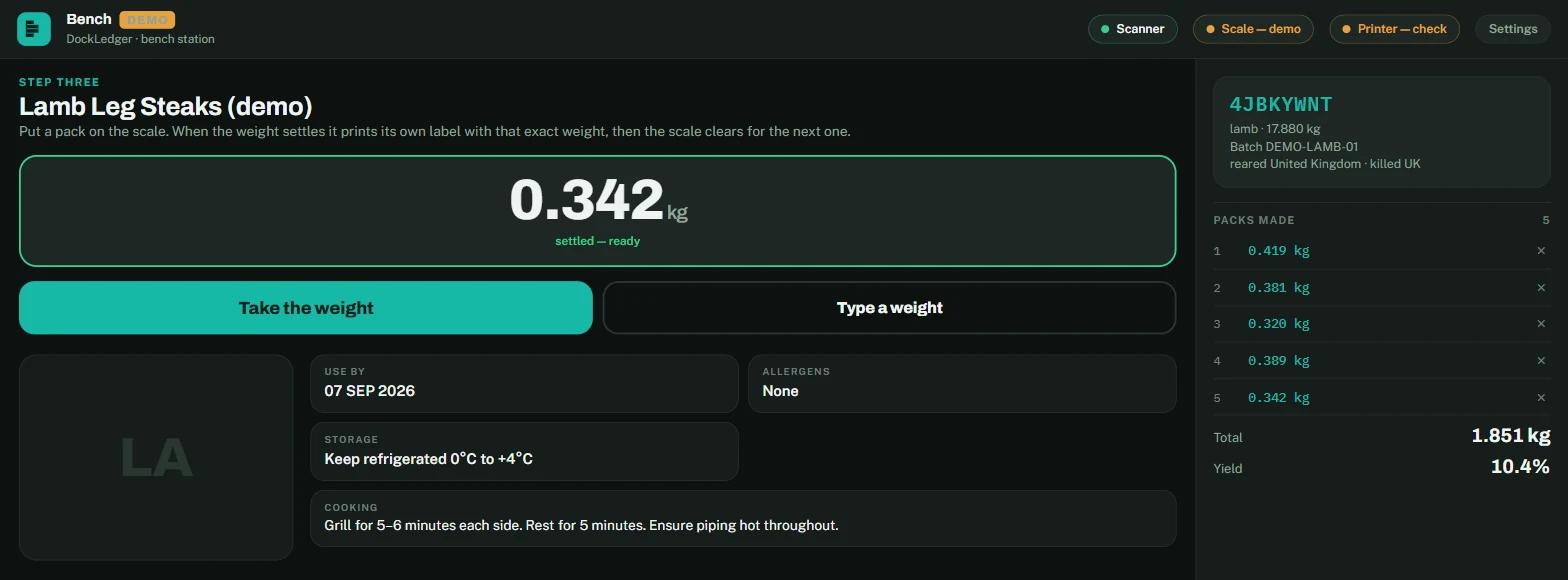
The bench station is the factory-floor version of the butchery app: a touch screen with a USB barcode scanner and a serial scale, doing the job an OSM terminal does. Scan the box, tap the product, then put each pack on the scale — when the weight settles, that pack's label prints with its exact weight and the scale clears for the next one. Every pack is weighed individually; nothing is averaged.
Connecting the kit
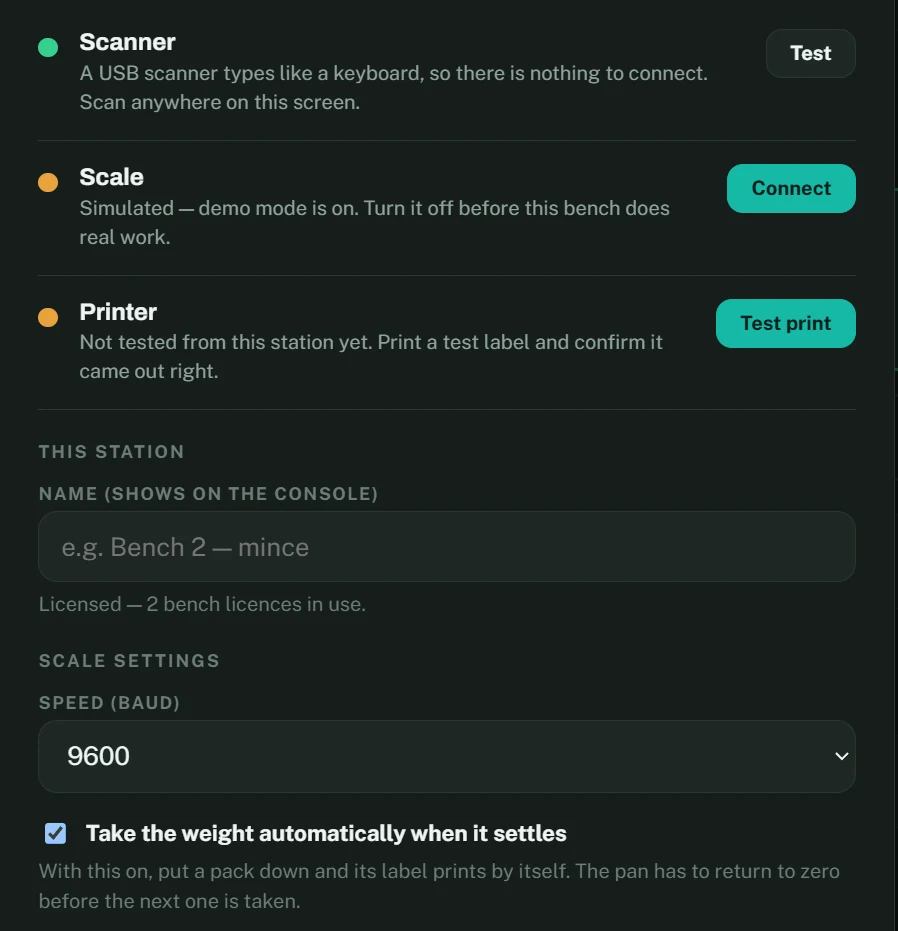
- Scanner. A USB scanner types like a keyboard, so there is nothing to connect. Scan anywhere on the screen.
- Scale. Connect it once from Settings — Chrome asks which serial port. A&D, Mettler and most bench scales that talk over USB or RS-232 are understood; the baud rate is in the same panel.
- Printer. A browser cannot see a printer, so the station asks you to print a test label and confirm it came out. Until then the printer chip stays amber, honestly.
- Demo mode pretends there is a scale, so the whole flow can be shown on any laptop. The screen is badged so nobody mistakes it for the real bench.
Licences are per bench, not per person
People and roles
Add people under Users & Team. Office users and managers sign in with an email address. Checkers, pickers and butchers get a floor login — a username and a password a manager sets, no email needed — which opens their app and nothing else. What someone can see is decided by their role and, if a manager has set one, their suite; never by the person themselves.
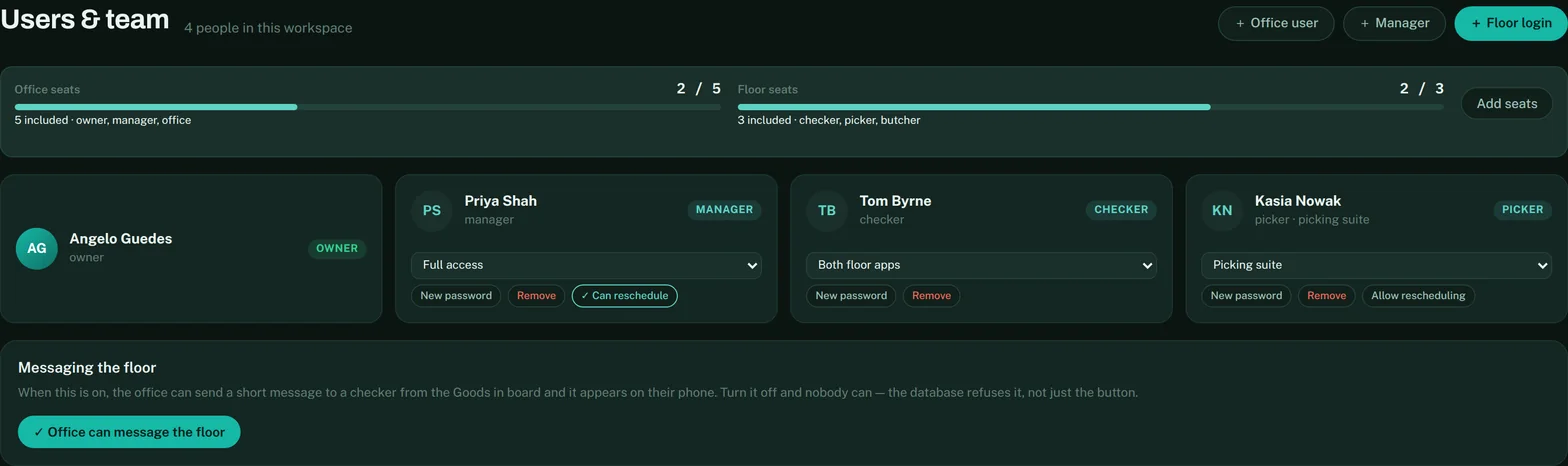
The platform includes five office seats (owner, manager, office) and three floor seats (checker, picker, butcher). Beyond that an office seat is £19 and a floor seat £12 per person per month, added under Plan & billing. Drivers, hauliers and suppliers never use a seat.
Portal links are bearer tokens
Plan & billing
Everyone pays for the Platform — live bookings, driver check-in, contacts, your own branding, and the first five office and three floor logins. Everything else is a module you switch on from Plan & billing: Warehouse & racking, Case picking, Deliveries & evidence, Telematics, the Carrier & supplier portal, the TV wallboard, and Meat traceability with its bench stations. A haulier yard pays for the platform and nothing else; a cutting plant pays for traceability and its benches. Current prices are on the pricing page.
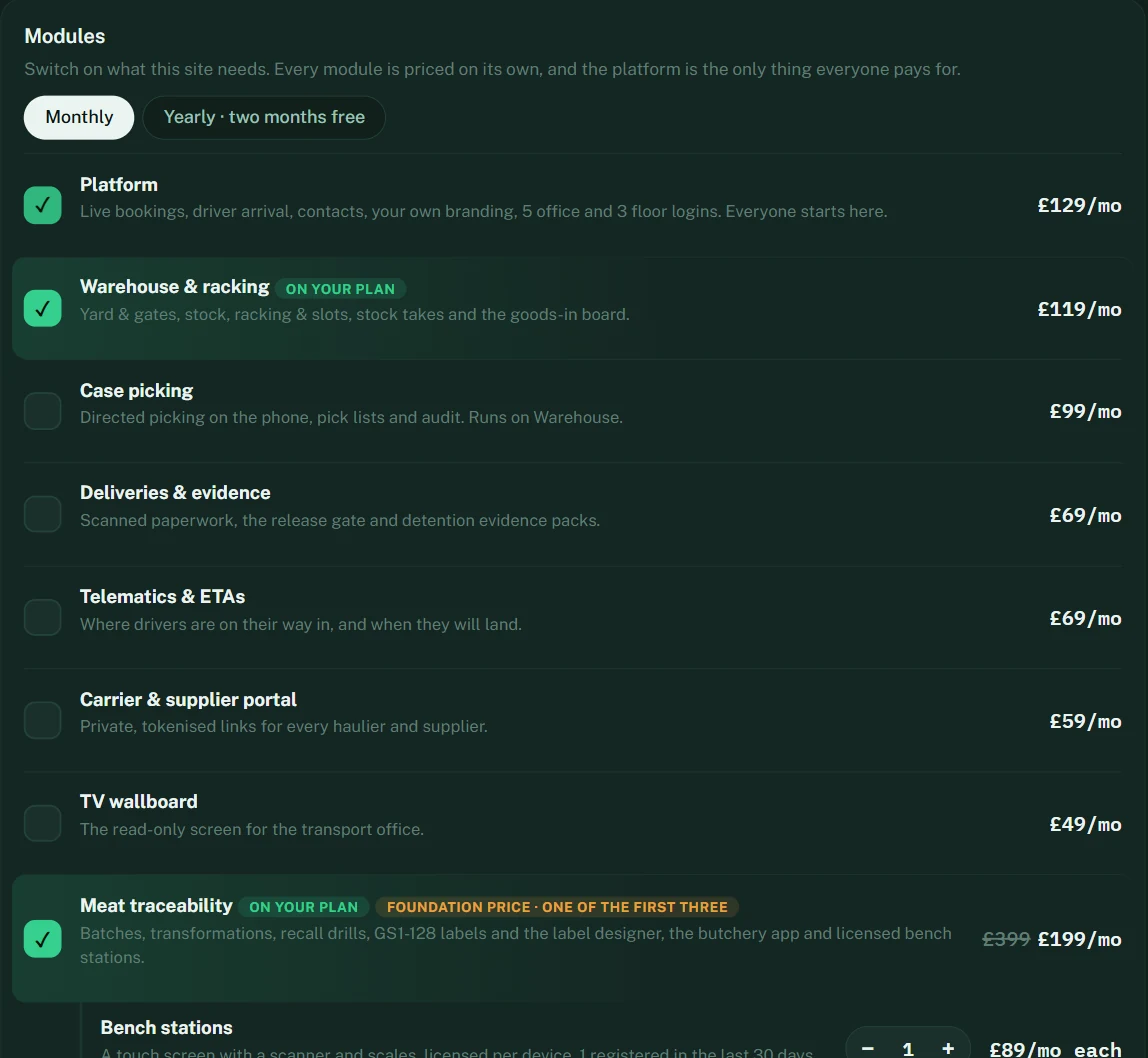
- Every change is priced before it happens. The page asks the billing server what it will charge for your selection and refuses to continue if the two ever disagree.
- Switching a module on or off changes your running subscription pro-rated from that day. No new checkout, no phone call. The tab appears in the rail for everyone within a minute.
- Seats and benches are counted on the same page. Add office or floor seats when the included ones run out; add a bench licence for every station you register.
- Getting set up is optional and priced separately: Essential setup (remote, one day) or Full commissioning (two days on site, every spec written and signed off, your first mock recall run together). The scope is agreed in writing before the work starts.
- Cards, invoices and cancelling live in Stripe's secure portal, opened from Manage billing. Card details never touch DockLedger.
Every new workspace starts with 14 days free of everything. Cancelling stops the next charge; your data stays exactly where it is and remains exportable.
Common questions
How do I get help?+−
Email hello@dockledger.co.uk. One person reads it and answers — usually the same day, and always the person who wrote the thing you are asking about.
Do drivers need to install anything?+−
No. They scan the QR code on your gate sign with the camera app their phone already has.
Do carriers need an account?+−
No. The portal link is the whole credential.
Our supplier doesn't print proper pallet labels.+−
Print a run of your own pallet plates from the Goods In screen and stick one on each pallet as it comes off; the checker scans the plate, picks the product and counts the cases. Reconciliation then runs on product and batch rather than pallet number, and everything downstream — put-away, the rack plan, picking by date — works the same.
Something is missing from my navigation.+−
Three possible reasons, in this order: your role does not include it (People and roles), your site has switched it off under Workspace tools on Plan & billing (Setting up), or its module is not switched on for your workspace (Plan & billing).
A contact is showing as the wrong type.+−
Change it on the Contacts screen. It matters more than it looks: the type decides which deliveries their portal link shows them. A supplier filed as a carrier would be looking for its deliveries under the wrong name and find none.
Can one company be both a carrier and a supplier?+−
Yes — a producer that runs its own lorries often is. Add it twice, once of each type, and it gets two separate links. Each one shows that side of the business.
Can two sites share one workspace?+−
Use one workspace per site and switch between them with the workspace picker at the top left. Bookings, racking and contacts belong to a site, and mixing two sites into one makes every screen harder to read.
Does it work on a phone?+−
Yes. Driver check-in and the floor apps — checker, picker, counter, butchery — are built for a phone or a scanner gun first. The office console works on one, though the wide tables are easier on a tablet or a desktop.
Why did the board not update?+−
It should have — every screen updates for everyone within a second of a change, with no refresh. If it ever doesn't, the tab has usually been asleep for a long time; click anywhere and it catches up. If it keeps happening, tell us which screen.
Something is wrong and I need a person.+−
Email hello@dockledger.co.uk. Say which screen and what you expected — that is usually enough to fix it the same day.